Garlic croutons

A little-seen savoury recipe for today, rather than the usual sweet treats I try out. I had some slices of white bloomer bread left over from the weekend that had gone stale and I fancied making some croutons to go with an evening meal.

croutons-1
Leftovers

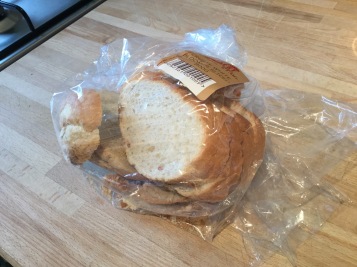
Embarrassingly I didn’t know how to make croutons properly – I thought it was a case of toasting the bread and then cutting it into cubes, which you can do but it makes for a very boring crouton. Instead I looked on Pinterest for some more exciting ideas and I found this pin for ‘easy garlic croutons’. Easy is always a key word in my Pinterest searches. And it was indeed an easy make. Cut the stale bread into cubes, sprinkle with salt, pepper, dried parsley and garlic.

croutons-3
The main ingredients

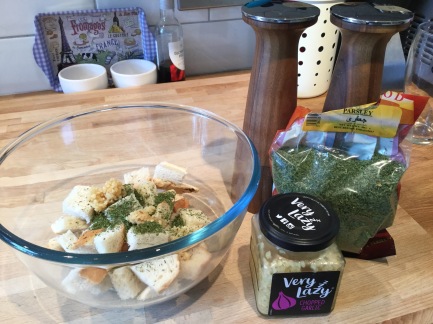
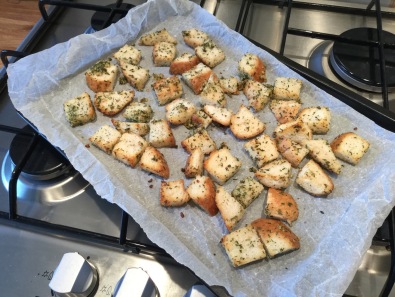
The recipe suggested garlic powder but as I didn’t have any, I used crushed instead. Then drizzle oil over the bread and mix well before putting it all onto a baking tray and into the oven. I went for 190°C for 10 minutes, turning halfway.

croutons-4
Halfway through

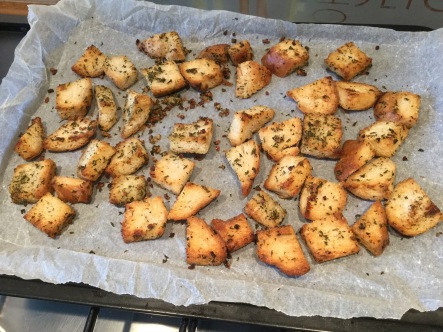
They turned out very tasty and went well sprinkled on top of the evening’s pasta dish. I’d try the suggested garlic powder next time, or crushing the garlic more, to avoid the chunky, slightly burnt bits left on the tray. They last well in an airtight container for several days.

croutons-5
Finished and delicious

Recipe here: https://uk.pinterest.com/pin/AX7H8LIUVHgrVLNYX4hmEQe2TX70t0nOJY6k3gkF08hhZXlOhfJJre0/

Butterfly framed art

In looking for ideas for decorating a nursery, I found pins for framed butterfly prints and thought, I can do that!

01fe7484cb3f286c9399ab84577017f51d2c7896c3
And I could do that!

I popped along to my local Homebase and picked up lots of samples of the girliest wallpapers I could find (free), to Wilkinson’s for a box frame (£4.50) and a tester pot of pink paint (£1).

One of the wallpaper samples I chose had butterflies all over it, so I cut out a small one to use as a template, rather than print an outline from Google Images or attempt to draw one myself. I then cut out 12 butterflies; two from each style of wallpaper. I folded six of them down the centre to make the wings appear to lift from the background.

I painted the frame with some basic emulsion paint in ‘marshmallow’. This needed three coats of paint as the bare wood soaked up the first coat almost immediately.

01ad222139955d01938117c51cb37ac618bac601a4
Nicely painted frame

I then glued the six flat butterflies to a plain background and the six folded ones on top, and reassembled the frame. Et voilà!

On Pinterest, the frames I spotted were for sale on sites like Etsy for well over £10. Mine cost me £5.50 and only a few hours of my time. And I think it’s perfect for a little girl’s bedroom.

01fe7484cb3f286c9399ab84577017f51d2c7896c3
Pink, pretty, perfect for a little girl’s bedroom

Link here: https://uk.pinterest.com/pin/533324780856225355/

Cinnamon rhubarb muffins

My faithful patch of rhubarb in my garden has produced what I think will be its last crop of the year, so I turned back to an old favourite bake of mine – muffins. However I have made rhubarb crumble muffins loads of times (see previous post) so I looked for a new recipe to try out. I chose this recipe as it didn’t call for too much rhubarb (I only have a small patch) and it used an exciting new ingredient, soured cream… It ain’t just for nachos!

muffins-3
Cinnamony-rhubarby goodness

Muffins are always an easy make and this was no exception, but it did create a lot of washing up, boo! The wet ingredients had to be mixed in a separate bowl to the dry; the butter had to be melted in a bowl; the rhubarb had to be chopped and kept somewhere – I chose another bowl; the lovely cup measures were used again. I’m sure I probably could have doubled up the use of some of the bowls and not made as much mess.

muffins-1
Just *some* of the utensils used!

All in all, these are a lovely muffin and the cinnamon sugar on top is delicious, so move over rhubarb crumble muffins, these may now be my favourites.

muffins-2
Uncooked, with the cinnamon sugar on top
muffins-4
Close-up time

Recipe here: http://pin.it/esKi0_z

Spiced plum crisp

I had some plums to use up before going away on holiday so turned to trusty old Pinterest for some inspiration. One of the first pins I found was for this, a spiced plum crisp, which on the picture looked suspiciously like a crumble. And like a crumble it was.

crisp-1
The leftover plums

The description says “the easiest, most delightful dessert you will make”, and this was no lie. Chuck the plums in an ovenproof dish with some sugar and flour. Make the ‘crisp’ (aka crumble) topping and stick it on top of the plums. Bake and voilà!

crisp-2
With and without the ‘crisp’

It’s an American recipe so it meant I could dig out my lovely ceramic cup measures again and not worry about converting the measurements to grams. Though I did need to google what 350°F is in Celsius… 176.667°, if you’re interested.

Pear Flapjacks 3
I got to use these again 🙂

I think what makes this a ‘crisp’ rather than a ‘crumble’ is, it’s American (haha) and the topping contains oats, although I often do add oats to my crumbles for some extra texture. I overdid the spice a bit so would use less next time to enjoy the flavour of the plums more, but the recipe was both easy and delightful overall.

crisp-3
Lovely with a dollop of vanilla ice cream

Recipe here: http://pin.it/7IB1Bz-

Joining and edging the willow squares blanket

You may have read my previous posts about making crochet willow squares and blocking them; the next jobs were to join the squares and put a border on the whole blanket.

b
The finished blanket

There are lots of ways to join crochet squares and most of the methods I found were for joining granny squares. The individual granny squares tend to have a triple crochet outer round whereas the willow squares have two rounds of double crochet, so I struggled to work out the conversion (I am a crochet novice!) to join them together. I then found someone who simply ‘sewed’ the squares together with a darning needle and yarn so I tried that, and it worked.

blanket-3
‘Sewing’ the square together

I joined the squares into rows first and then rows to rows. Since I am a novice, not all my squares had the same amount of stitches on each side so I had to double up some of the stitches but it is subtle and doesn’t ruin the final product.

blanket-5
Row 1 complete

I decided on a ‘scallop’ border as it’s a simple design which I thought wouldn’t take away from the pretty detail of the willow square. It also helped that it is a simple pattern to follow. Overall, I’m really rather chuffed with myself and the first baby blanket I’ve made.

blanket-2
Close-up of the scallop border

Joining link here: https://uk.pinterest.com/pin/533324780854783260/

Border link here: https://uk.pinterest.com/pin/533324780854783265/

Crochet star blanket

I began this blanket at New Year after seeing a Bella Coco video tutorial pop up on my Pinterest feed, and made great progress initially – the short sides of the star meant it built up quickly. But then the progress slowed down. A lot. The miserable dark winter nights, a kitchen renovation and the early stages of pregnancy led to a lazy me who put the blanket aside and left it for several months. 

Finally finished!

Along came summer, renewed energy levels and a finished baby blanket (see previous willow square posts) and so more motivation to get the star blanket completed. It was slow-going, with much longer sides to complete but I got there in the end. I toyed with the idea of making it my biggest blanket yet by adding one more round of each colour, but my lazy side, and lack of yarn, stepped in and stopped that idea! 

Starry 🙂

I did struggle with the curling corners of the star, and I added an extra round of double crochet (the rest is all triple) to try and flatten it out, but with only minor success. I would try blocking it, but I don’t actually have enough floor space to lay it flat, so for now I’ll live with the curled corners. 

Curly :/

Link here: http://pin.it/v4DuKdQ